Table of contents Toc Icon
Table of contents Toc Icon
Custom email templates in QuickBooks Desktop are pre-defined message layouts (subject and body) that you can apply when emailing customers or vendors. With these templates, you can personalize each email with your branding and tone, while automatically filling in transaction details.
For example, you might create different templates for invoices, estimates, statements, purchase orders, or bill-payment stubs. QuickBooks attaches the chosen template automatically when you send a transaction – no need to rewrite the email each time.
This streamlines communication and ensures a consistent, professional look for all emails sent from QuickBooks.
Why you Should use Customized Templates in QuickBooks
- Branding and consistency: Maintain a uniform style (logo, greeting, sign-off) across all outgoing emails to reinforce your company’s image and maintain a consistent brand presence.
- Personalization: Use customer-specific greetings or references by including dynamic fields (like the customer’s name or invoice number) in the template.
- Efficiency: Save time by preparing standard language (terms, payment instructions, thank-you messages) once, then reuse it.
- Compliance: Include required information or disclaimers (tax notices, privacy statements, legal boilerplate) automatically in every email.
- Professionalism: Ensure every customer or vendor sees polished, error-free communications.
To build a new template from scratch:
- Under Send Forms > Company Preferences, choose the Transaction Type for which you want a template (e.g., Invoice or Estimate).
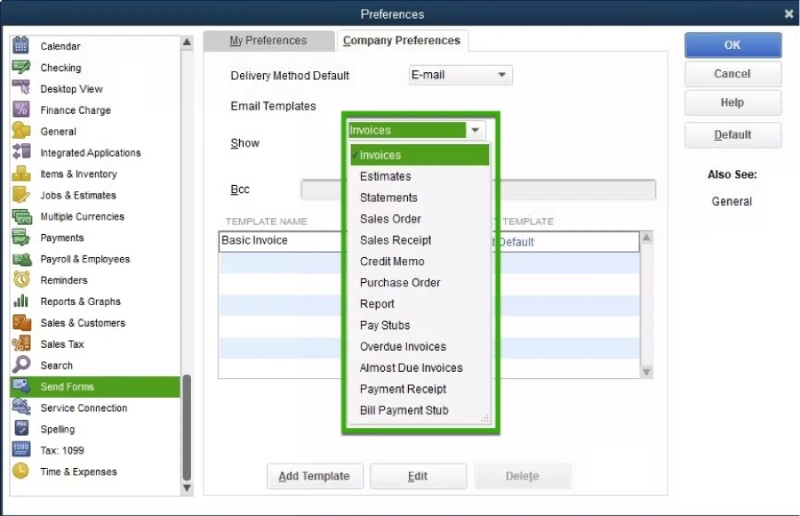
- Click Add Template. Give the template a unique Name.
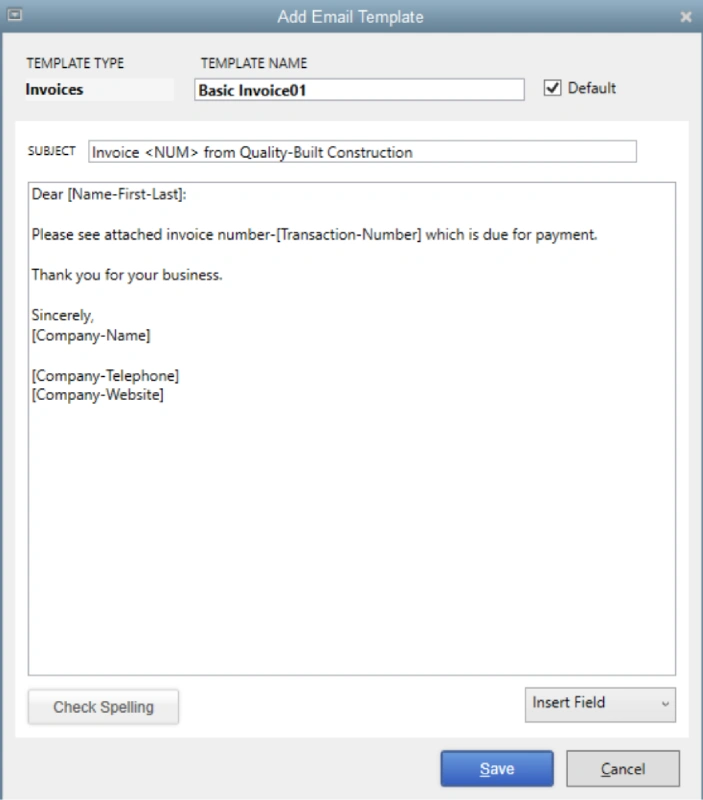
- Enter your Subject line and Message body as you want the email to appear. Include any text, formatting, or logos (if supported).
- Insert dynamic fields: Use the Insert Field button to add placeholders that pull data from the transaction. For example, you can insert Customer Name, Invoice Number, Due Date, Transaction Total, etc. QuickBooks will replace these fields with real values when sending the email.
- Save the template: Click Save and then click OK on the Company Preferences tab to apply changes. Your new template now appears in the list for that transaction type.
Example: You might create an “Invoice Reminder” template with a friendly greeting and payment instructions, and an “Overdue Notice” template that is more formal. By inserting fields like [Customer Name] and [Due Date], each email automatically addresses the right person and refers to the correct invoice details.
Modifying or Deleting Existing Templates
To change an existing template or remove it:
- Go back to Edit > Preferences > Send Forms > Company Preferences.
- Select the transaction type (e.g., Invoice, Estimate) that has the template.
- In the Email Templates list, select the template you want.
- Click Edit to modify the subject, body, or fields. After editing, save and close the template window, then click OK in Preferences to keep changes.
- To remove a template entirely, select it and click Delete and OK to confirm deletion.
All templates remain listed until deleted. You can create and maintain multiple templates for each transaction type (for example, separate invoice templates for different customer groups).
Using Dynamic Fields in Templates
QuickBooks lets you drop in placeholders that automatically fill with transaction data. When editing a template, use Insert Field to choose fields like Customer Name, Invoice Number, Due Date, Transaction Total, and more. For example:
- In the subject line, you might write “Invoice [Invoice Number] for [Customer Name]”, and QuickBooks will replace the brackets with the actual values when emailing.
- In the body, you could write “Hello [Customer Name],\n\nYour invoice #[Invoice Number] is due on [Due Date]…” and each email will personalize itself.
These dynamic fields ensure accuracy and personalization. You can also type the field names manually if they match the available options exactly. Always double-check field names against the Insert Field list to avoid empty or incorrect text.
Setting a Default Email Template
After creating templates for a form, choose one as the default so it’s used automatically:
- In Preferences > Send Forms (Company Preferences), pick the transaction type.
- In the list of templates for that type, click Set Default next to the template you want to use routinely.
- Click OK to save.
Now, whenever you email that form, QuickBooks will load this default template by default at quickbooks.intuit.com. You can still change to a different template in the email window if needed, see the next section.
Sending Emails with Templates
When you email a form (Invoice, Estimate, etc.) from QuickBooks Desktop, the program uses the default template for that form type. For example:
- To email an invoice, open the invoice and click the Email button on the toolbar, then choose “Invoice”. QuickBooks will generate an email using your default invoice template.
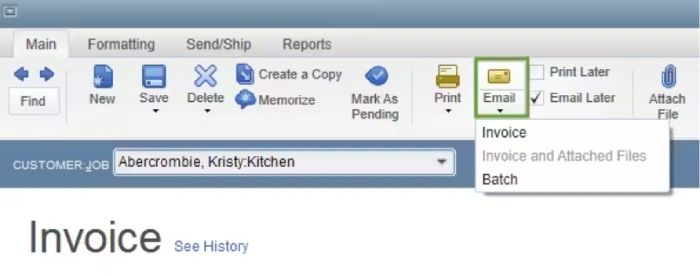
- If you don’t want to send immediately, select Email Later. This adds the transaction to the Send Forms queue, where you can batch send multiple documents. In that queue (File > Send Forms), you can pick a template from a drop-down for each form before sending.
QuickBooks then composes each email using the chosen template. If you ever need a different template for a particular email, you can override the default at send-time: in the email window, there is usually a Template menu or drop-down.
Simply select the alternate template you created. For example, even if “Standard Invoice” is the default, you could choose an “Overdue Invoice” template for a late payment email.
For vendor forms: In QuickBooks Desktop 2022 and later, you can also email Bill Payment Stubs to vendors using a template. When entering a bill payment, click Email > Bill Payment Stub. QuickBooks will use the default Bill Payment template (or allow you to select another) in the same way it does for invoices.
Summary
Custom email templates in QuickBooks Desktop help you send clear, consistent, and professional emails without extra effort. By creating templates for invoices, estimates, statements, and other forms, you can save time, maintain your brand identity, and minimize manual errors.
Features such as dynamic fields, default templates, and easy editing make it simple to personalize messages while maintaining accurate and compliant communication. Overall, email templates streamline day-to-day transactions and improve how your business communicates with customers and vendors directly from QuickBooks.
Host QuickBooks in the cloud with Ace Cloud Hosting for reliable access to your accounting data and dedicated support that helps prevent errors and delays.
Our experts are ready to assist with setup, troubleshooting, or any product issue. Get in touch now!